Wednesday, March 31, 2010

Microscopes: What is That?


An introduction to microscopes…. Set up a series of microscopes, each already focused on a common, household item. Students proceed around the room to look at each substance – the microscopes should already be focused and students do not need to touch anything other than looking through the eyepiece. They should sketch what they see in each microscope and hypothesize about what the substance is.

Some items you might want to use:
-Salt
-Sugar
-Flour
-Cornstarch
-Thread
-Hair
-Dust
-Newspaper

This is a good opportunity for students to learn how to look through the microscope and practice drawing what they see.

Tuesday, March 30, 2010

Natural Resources: Over Harvesting

Set up this activity to help students understand that sometimes humans take more natural resources than nature can produce.


Put students in groups of 2 or 3. You'll need 152 pretzel sticks for each group. The pretzel sticks represent trees/lumber

Within each group, you'll need someone to be the protector of the trees - he or she will 'plant' more trees each round. You'll also need someone to be the lumberjack, who 'cuts down' trees each round. If you have a third member of the group, he or she can record the data each round; if there are only two group memebrs, they can both record as the scenario plays out.

Begin with a 'forest' (pile) of 120 trees. Additionally, the protector will have a supply of 32 more trees

During each round, the following will happen...
- The protectors will 'plant' 4 trees from their source.
- The lumberjacks will double the number of trees they are 'cutting down' each round, starting with 1.
- The recorder records how many trees are left at the end of the round.


After explaining the scenario, but before beginning the actual process, ask students to guess how many rounds it will take before there are no natural resources left.

What can we do to protect our natural resources from over-harvesting?
********************************************
Here's a table you can set up to help your students record their data:

Natural Resources + Trees Added - Trees Consumed = Trees remaining

The first two rows of data should look like this:

120 + 4 - 1 = 123
123 + 4 - 2 = 125


You could also use Goldfish crackers for the activity - replace the lumberjacks with fishermen and you're all set!

Monday, March 29, 2010

It's....

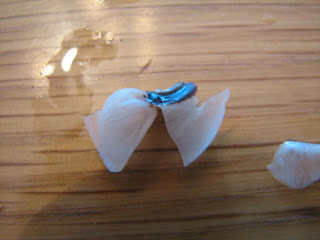
...a piece of petrified wood. I picked mine up* at the Painted Desert/Petrified forest when there on vacation.


*I purchased mine at a gift store within the national park, I did not pluck it from the park. That would be highly disrespectful and illegal.

******
What Is It? is a feature you can add to your classroom. Once a month, or thereabouts, put out something new and ask students to try to identify it. If they figure it out correctly, give them extra credit, a prize, a high five or bragging rights!

Fortune Telling Fish


When you hold a fortune telling fish in your hand, it immediately curls up.


Why???
After allowing your students to 'play' wish their fish for a few minutes, challenge them to figure out how they work. It's a great way to jump start the school year and have the students carrying out the scientific method (without even thinking about it!).

Fortune Telling Fish can be found at novelty stores (they're really expensive there - don't get them there unless you only need one or two or you are in dire need of one NOW), through Oriental Trading Company or here.


PS Everyone's first guess is that they work because of the heat in your hand.... that's not it! See if you can figure it out! If you're really stumped, send me a message and I'll give you a clue.

Friday, March 26, 2010

What Is It?

Consider adding a What Is It? feature to your classroom. Once a month, or thereabouts, put out something new and ask students to try to identify it. I will try to share some ideas for this feature with you periodically. Unfortunately, the virtual version of this game isn't perfect - you can't pick up the object to get a feel for its mass, density and to examine it from all angles. But hopefully I will give you some ideas for objects you can present to your students.
First up...


Look for an answer on Monday!

Thursday, March 25, 2010

Atoms: Atom Models


For a couple of years, I have assigned Mr. Niven's Atom Project to my students. I have typed up my own instructions (as some of his statements wouldn't make sense to my students), but required the same elements as Mr. Niven. I've greatly enjoyed the resulting projects and appreciate the "able to hang from the ceiling" requirement. Getting them to hang is a bit of a chore, but once they're up, they're enjoyable to look at and they don't take up precious space on lab tables or elsewhere.

Once the projects have been turned in, I like to have students take turns sharing the information they found. To keep other students paying attention, I have them take notes of the highlights. Then, after everyone has presented, they are given a brief quiz ("This element is the most abundant in the universe.") during which they can use their notes. For students who have paid attention, it should be an easy way to boost their grade.

FYI The models pictured here were created by my students. And, with regard to the second model, it did have the appropriate number of electrons... they started to fall off while being stored.

Wednesday, March 24, 2010

Plants: Dissect a Seed

So simple, but brings the textbook picture to life…
Soak dried beans (from the grocery store) in water overnight.

Provide each student with a seed. They can identify and remove the seed coat.

Then, split the seed open and identify the cotyledon (seed leaf) and stored food (the bulk of the seed).

Tuesday, March 23, 2010

Weather: Cloud in a Bottle

Clouds will not form unless 3 “ingredients” are present:
1. Moisture
2. Particulate matter
3. Pressure

You’ll need an empty 2L plastic bottle with its cap, a match and a small scrap of paper.

Place several drops of water in the bottle - moisture. Use the match to light the small piece of paper on fire, let it burn for a few moments, then drop it into the bottle - particulate matter - and quickly cap it. Then apply pressure by squeezing the sides of the bottle. Release the sides and your cloud will appear. Squeeze again and the cloud will disappear. Release the sides and the cloud will reappear. You should be able to get the cloud to form several times before you need to begin again.

Encourage students to each bring in their own bottle, so they can each make their own cloud (the teacher should keep the matches). Also, you may want to encourage students to experiment to determine if it’s possible to form a cloud if one of the components is missing.

Monday, March 22, 2010

UV Beads


UV beads appear white until they are exposed to ultra-violet rays (namely, the sun), at which time they change color.

There are several ways you could use these beads in your science classroom. Here are a few ideas...

Provide each student with a bracelet (several beads strung on a pipe cleaner) to wear for a day. They need to note any time the beads change color and then hypothesize what causes the color change. You can require the students to return the bracelets at the end if you wish, so you don't have to keep investing in beads.

Test the effectiveness of sunscreen using the beads - does it block enough of the UV to keep the beads from changing color?

Test the effectivness of your sunglasses using the beads.

Does UV travel through clouds? (Will the beads change color even on cloudy days?)


I got my beads from Steve Spangler Science. They have all variety of UV items - nail polish, beads, etc. as well as a whole catalog filled with science-y toys. You can also get the beads here. If you know me in real-life and want to borrow a few to check them out... let me know!

Friday, March 19, 2010

Favorite Website: Access Excellence


There's another great collection of life science activities found at Access Exellence. I have spent most of my time going through the Fellows Collection (1994, 1995, 1996), but the rest of the site is worth looking at as well. As with all my favorites, some individual activities will be featured in their own posts.

The activities found in this section of the website have been submitted by high school teachers participating in the Access Excellence program. As such, the activities were designed for high school students. However, many of these activities are very easily adaptable (or usable as is) for lower grade students.

Thursday, March 18, 2010

Inertia: Knock the Penny Out


Make a stack of 5 or 6 pennies. Use another penny to try to knock the bottom penny out, while keeping the rest of the stack in tact.

Go a step farther and make your stack of pennies on a piece of paper. Trace a circle around the pennies. Now, try to keep the stack of pennies in the circle after you knock the bottome one out.

Wednesday, March 17, 2010

Cellular Respiration: Respiration in Yeast


Place some yeast, sugar, and warm water in a flask (or bottle with small neck). Quickly place a balloon over the flask opening and allow it to sit for the class period (or longer).

At the end of the period, you will find the balloon has inflated. It is filled with carbon dioxide released during cellular respiration.

You can prove that it’s carbon dioxide and not oxygen: light a wood splint or popsicle stick on fire and then blow it out so that it’s just glowing. Release the contents of the balloon onto the glowing splint. If it’s oxygen, the splint will return to burning; if it’s carbon dioxide, it will go out.

A note about my pictures... In the picture of the initial set-up, the bottle only has a little water in it. It wasn't enough - the yeast respirated, but the carbon dioxide they emitted took up the remaining space in the bottle and didn't make it to the balloon. I redid the experiment, filling the bottle much fuller, which resulted in an inflated balloon; but I didn't retake the set-up picture.

Tuesday, March 16, 2010

Earthquakes & Plate Tectonics: Plot Earthquake Data


Use the US Geologic Society website to print out a copy of the most recent earthquakes. Provide students with a world map with lines of latitude and longitude clearly marked. Have students plot the points at which the earthquakes occurred. Compare the plotted data to a map of the tectonic plates. If enough data points are plotted, you will see an outline of the tectonic plates form, as most earthquakes occur along those faults.

If you wish, to get more data plotted more quickly: print out the world map on overhead transparencies for each student. Have each student plot several points on their transparency. Then stack the transparencies on top of one another to create a single map.

Monday, March 15, 2010

States of Matter: Bouncy Balls


Empty a large, clear container (large pretzel or snack mix jugs). Fill part way with rubber bouncy balls. Use to demonstrate states of matter as follows:

Solids: barely shake the container, just enough to cause the balls to jiggle, but keep them in their place. The atoms/molecules in a solid possess kinetic energy, but not enough to remove any individual atoms/molecules from the group.

Liquids: shake the container a little harder, so the entire “clump” moves together. The atoms/molecules in a liquid posses more kinetic energy than those in a solid. Liquids can change shapes, but the atoms/molecules stay “attached” to one another.

Gas: shake the container even harder, so that the balls begin to bounce around the container, independent of one another. The atoms/molecules in a gas possess a large amount of kinetic energy. They will bounce around to fill the space they have available.

If you don't have a large container, or enough balls for a large container, you can make a smaller version (as seen above). It's probably not quite as effective as a demonstration as the larger version, but it works.

Friday, March 12, 2010

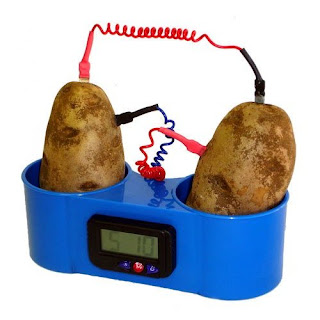
How Does That Work? Potato Clock

The first of the How Does That Work? series on the Science Matters blog. I will periodically show you products and demonstrations that you can present to your students and challenge them to explain the science of how they work. Make sure you decide ahead of time what you'll accept as a valid explanation - can it be printed straight off the internet, written in the student's own words, or does the student need to be able to explain it to you conversationally? What will a valid explanation earn the student - a prize, extra credit, a feeling of goodness?

I try to set out a new How Does That Work? or What is That? (more on that soon) challenge about once a month. It would be great to switch it up even more often, but I haven't yet built up my repertoire quite enough.

Up first...

The Potato Clock! Set one up and amaze your students. Change the power source regularly - all sorts of fruits and vegetables will work to power the clock, as well as some liquids! Challenge your students to explain how the potato clock works.

Here is one explanation that might help you and your students understand the process. The internet is full of explanations - some geared to younger students and some to older. Find something that meets your needs.

Thursday, March 11, 2010

Mixtures: The Mistake


This is a fun, open-ended lab for your students to put into practice that which they've learned about separating mixtures. Read the following story to your students (this is the original, you'll want to swap out "Home Ec" for whatever's appropriate in your school). Then, provide them with a sample of the salt and pepper mixture, a variety of tools, and let them have at it.

You may want to read the story to them the day before they'll perform the separation... gives them time to come up with a plan and gives you the opportunity to gather any materials they may wish to use that you hadn't thought to put out.


The Mistake
What kind of day was it? A day like all days - only THE SUBSTITUTE was there. The place was Home Economics and the substitute - one Mrs. Dimwitty. In her demonstration, Mrs. Dimwitty was to add salt and pepper to her baked dish. In trying to save time, Mrs. Dimwitty mixed the salt and pepper together before class. Upon reading teh recipe very closely, she discovered that the salt and pepper had to be added at different times. What an embarassment. What would she do now? All teh salt and pepper she had was in one jar - all mixed up. One of Mrs. Dimwitty's students said she could help if allowed to go to the science department. A short time later she came back with two jars - one containing salt, the other containing pepper. What a relief. The casserole would be a success.

In this lab you are to separate the salt and pepper mixture that you find in your test tube into two piles. Salt must be piled on one paper towel - pepper on another. You WILL NOT get another test tube so be careful. Don't throw anything down the drain until the end of the period. After you have separated the salt and pepper, bring them to the front desk for inspection. There should be no salt in the pepper and no pepper in the salt. After your separation has been approved, give a step by step description of what you did on the back of this sheet.

Wednesday, March 10, 2010

Diffusion: Perfume in the Room


Place an open container of perfume (or other scented substance, such as vanilla) in a corner of the room. Have students raise their hand when they first smell the scent. Or, they could quietly note the time at which they first notice it and you can analyze the data later. You should find that students nearest the container are the first time notice it and it spreads outward from there.

To keep the results as honest as possible, don’t tell students where you’ve placed the container or what scent you’ve used.

Tuesday, March 9, 2010

Rocks: Sugar Cube Rock Cycle


Have your students complete the rock cycle, using sugar cubes.

You'll need:
--Sugar cubes,
--Squares of aluminum foil, folded into a "boat"
--Hammer (or other smashing device)
--Candles (birthday or Hanukkah)
--Lumps of clay
--Test tube holder
--Matches

Each student begins with a sugar cube, which reprsents the original sedimentary rock. Then...
--Weathering: Crush the rock with a hammer (or heavy book)
--Erosion: Move the crushed rock into the foil boat
--Heat/Melting: Using the test tube clamp, hold the foil boat over the candle flame until it melts. (Use a lump of clay as a candle holder).
--Cooling: Set the melted sugar aside for several minutes.
--Weathering: Break the new, igneous rock into pieces.


Warning: Melting sugar smells! Forewarn your neighbors and administrators before your classes get to work, so as to avoid unnecessary calls to the fire department!

Monday, March 8, 2010

Water: Drops on a Penny


How many drops of water do you think a penny can hold? Make a hypothesis as test it out... you might be surprised.

When beginning a unit or lesson on water, I like to ask my students to give me as many words as they can think of to describe water. I make a list on the board and at the end, add one or my own: sticky. Students look at me like I've lost my mind, but once they start on this experiment, they start to understand my description - the water drops stick to one another. A great introduction to the properties of adhesion, cohesion, and surface tension.


Encourage students to make up their own experiments. For example, which side holds more, heads or tails?

After going through the activity once, you can mess with your students a bit - put a little liquid soap in their water supply, or rub a little soap on the penny. The soap interferes with the surface tension and the pennies can't hold nearly as much water.

Friday, March 5, 2010

Favorite Website: Middle School Science


Get your printers loaded and ready to go... Middle School Science is another great website loaded with labs, lessons, and activities all ready for you to print out and take into your classroom. To find the goodies, click on the appropriate branch of science at the top of the home page (maybe it's just me, but every time I stop by the site, I start looking for them in the list in the left-hand margin and can't find them. Good reason... they're not there! They're at the top. If my head wasn't screwed on tight...).

Bonus... this year, she started a blog to go with her website. I haven't yet worked my way through the archives, but I will in the very near future. And will be subscribing to the feed as well.

Thursday, March 4, 2010

Atoms: Rutherford's Gold Foil Experiment

This is an original demonstration I created to try to help my students understand Rutherford's experiment: what he expected to have happen, what actually happened, and why it was significant. The demonstration is a bit crude (and it's starting to fall apart) - there's certainly room for improvement, but I think it does help students visualize what was happening. Please let me know if you find a way to improve upon this demonstration - I would love to hear about it.

Prior to Rutherford's experiment, the going theory about the atom was Thomson's Plum Pudding model. In this model of the atom, negatively charged material is scattered throughout the atom.

In Rutherford's Gold Foil experiment, he set out to shoot a beam of atoms at a thin sheet of gold foil. Based on the Plum Pudding model, one would expect most of the atoms to bounce back because the "negative" material is scattered throughout the atom, not allowing much room for atoms to pass by.


Instead, most of the atoms went straight through the gold. The resulting conclusion was that gold atoms must be made mostly of empty space, with a large central nucleus.


To create my stunning visual aids, I collected:
*a couple dozen small (~1") styrofoam balls
*a styrofoam disk (~2" in diameter)
*2 empty cereal boxes (on the larger size)
*thread
*a very large needle (used for upholstery)

Box 1: Thomson's Plum Pudding Model
-Cut open the sides of your cereal box, I left them on as flaps, to protect the model.
-Use the needle to sting the styrofoam balls onto the thread. (I used about 4 balls per thread and about 6 threads - adjust to the size of your box accordingly)
-Tape the ends of the threads to the top and bottom of the box.

Box 2: Rutherford's Model
-Cut open the sides of your cereal box, I left them on as flaps, to protect the model.
-Use the needle to run the thread through the styrofoam disk. Instead of trying to poke the whole way through the diameter of the disk, I ran thread through two holes that were poked through the flat part of the disk (examine the above picture).
-Tape the ends of the threads to the top and bottom of the box.

To demonstrate:
Rutherford thought he was shooting atoms at something resembling Thomson's model. Use an extra styrofoam ball and toss it at Box 1. The majority of the time, the ball should bounce back, because there isn't room for it to fit through. This is what Rutherford expected to have happen.

But... that's not what happened. Instead most of the time the atom (ball) passed through. Pull up Box 2 and toss the ball at it. This time, the ball should pass through a lot of the time. The only time it will bounce back is if it hits the nucleus.

Wednesday, March 3, 2010

Microscopes: Water Drop Microscope


Cut a 1” square out of the center of an index card (the shape and size are not important, you can decide how accurate you want students to be). Place a small piece of plastic wrap over the cut-out area and tape it so it’s taut. Place a drop of water on the plastic – you want it to maintain it’s drop shape, not spread out. Look through the water drop at some small writing, newspaper pictures, etc. The curve of the water drop will magnify what you are looking at, creating a very simple microscope.

I like to have students complete this activity after they complete their microscope quiz. I give out extra credit for anyone who takes their microscope home, shows their parents and has their parents write a note letting me know what they shared.

Tuesday, March 2, 2010

Minerals: Cost of 2L of Gold

Thanks to the soda/pop industry, 2 liters is a volume students are readily able to visualize. And, 2 liter soda bottles are readily available to use as a prop.


Ask students to imagine the soda bottle filled with gold (or silver or platinum). Use the internet (or newspaper) to find the current price for gold (gold is traded, thus the price fluctuates – get up to date information) as well as the density of gold. Then do the math (work through it with your students):


2L x 1000mL/L = 2000mL


2000 mL x 19.3 g/mL (density) = 38,600g


38,6000g x 0.035 (conversion unit) ounces/g = 1351 ounces


1351 ounces x $1,134.90 (price)/ounce = $1,533,249.90


Don't you wish you had a 2L bottle filled with gold!!!

Monday, March 1, 2010

Air Pressure: Crush a Soda Can


Place a small amount of water in an empty soda can. Place the can on a hot plate and heat until the water boils. While waiting, prepare a large container of cool water. Once the water has begun to boil, use tongs to pick up the can and quickly turn it upside down and place it in the water bath. The air in the can heats up, the air molecules start moving faster and some find their way out of the can, creating an area of low pressure. Turning the can upside down into the water creates a seal in which no air molecules are able to re-enter the can. The pressure outside of the can is greater, and the can is crushed.

To see a “real life” example of this phenomena, check out what happened to this train car when it was washed with hot water and sealed before it was cool.